> ## Documentation Index
> Fetch the complete documentation index at: https://docs.botshield.ai/llms.txt
> Use this file to discover all available pages before exploring further.
# Install and setup
> Install the BotShield managed package, assign permission sets, and connect your BotShield Console keys.
This takes about 15 minutes. When you're done, the **BotShield → Setup** tab shows a green health checklist and both rails are ready to use.
You'll need your **BotShield Console API key** (from [console.botshield.ai](https://console.botshield.ai/console) → **Settings → API Keys**). Keep it handy for step 3.
## 1. Install the package
Install **BotShield** from AgentExchange into your org (production or sandbox). After install, open the **App Launcher** and choose **BotShield** — you'll land on the Home tab with a health pill reading `0/8 ready` until setup is complete.
## 2. Assign permission sets
Assign the permission sets to the users who need them (**Setup → Permission Sets**, or the **People** section of the BotShield Setup tab):
| Permission set | Give it to |
| - | - |
| `BotShield_Admin` | Admins who configure BotShield and see every tab. |
| `BotShield_User` | People who link their BotShield app and are asked to approve actions. |
| `BotShield_Approver` | Users allowed to co-sign sensitive actions (e.g. refunds). |
| `BotShield_Integration` | The integration/run-as user that receives the Console data push. |
## 3. Connect your Console keys
BotShield calls your BotShield Console over **Named Credentials** — no keys are stored in code or metadata.
Go to **Setup → Named Credentials → External Credentials → `BotShield_Agent_Default`**, edit the principal, and paste your Console **agent key** into the credential parameter. This authorizes the Agents Ask rail.
On the `BotShield_Admin_API` External Credential, paste a read-only **Admin API** key. This lets the app sync your deployments and agents automatically. Without it, everything still works — you just add deployments manually.
In the **BotShield Setup** tab, set the environment to **Production** (or **Staging** while you test). This points the widgets and callouts at the matching BotShield hosts.
## 4. Connect the Console and choose what pushes
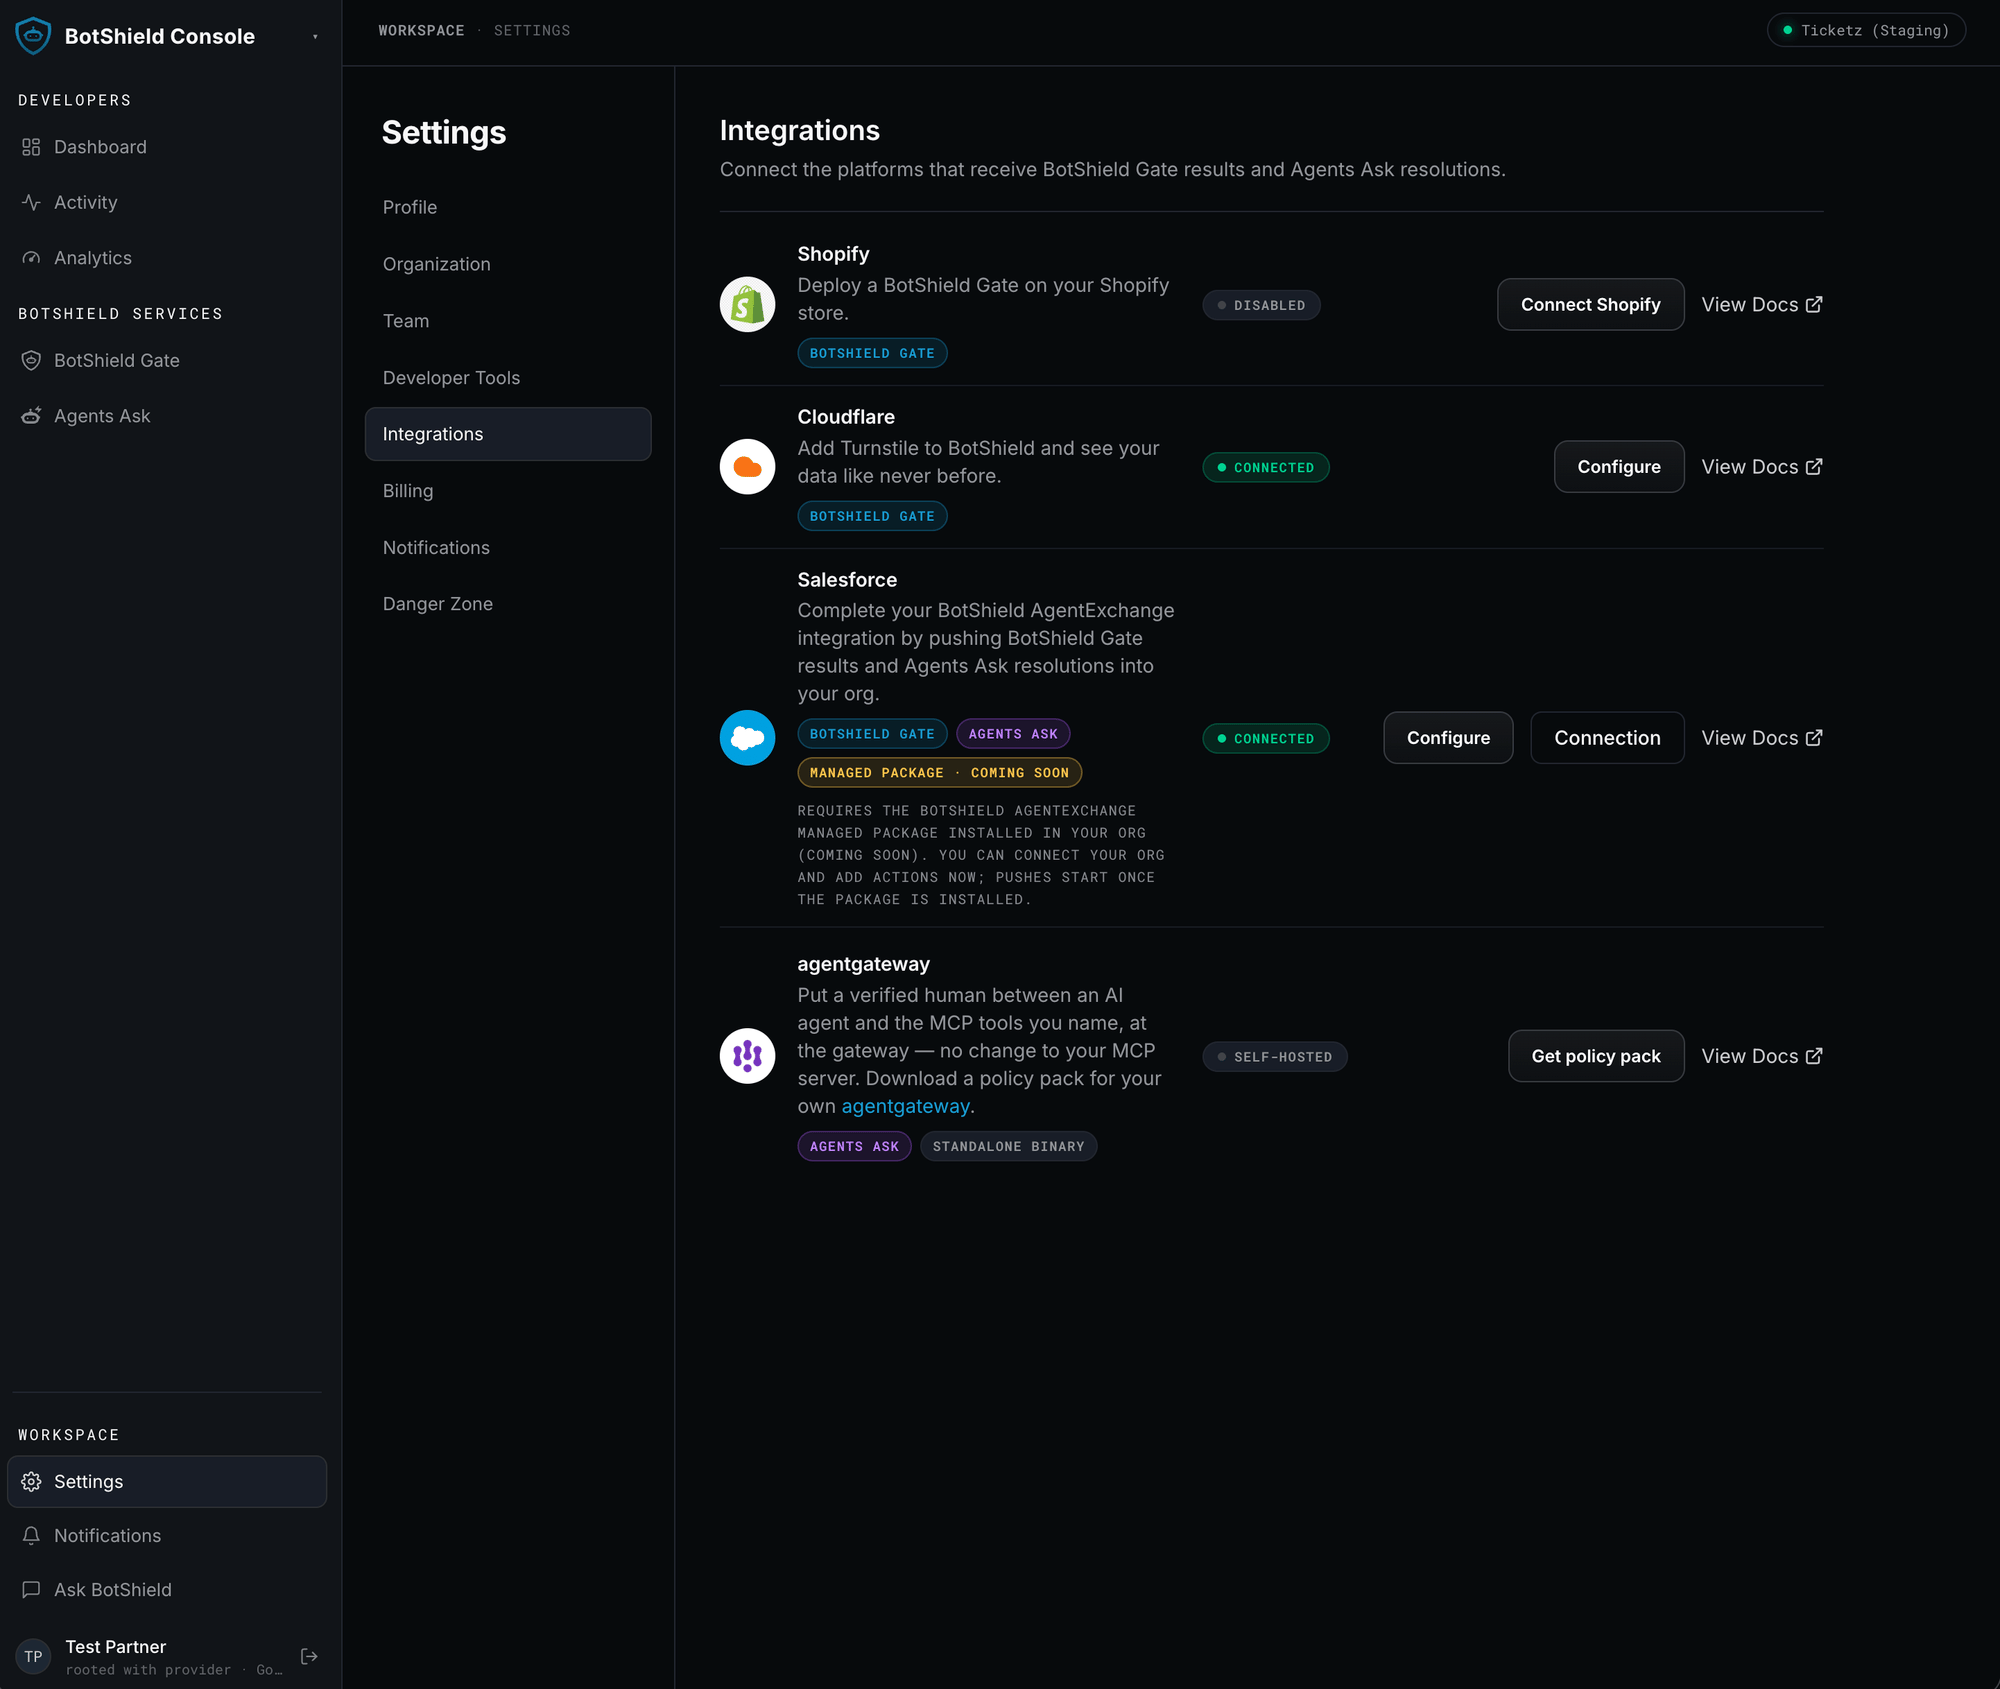
This is where you tell BotShield to write verifications and resolutions back into your org. In the Console, open **Settings → Integrations** — the list of platforms that receive BotShield Gate results and Agents Ask resolutions — and find the **Salesforce** card. It's two steps: **connect**, then **configure targets**.
 ### 4a. Connect your org
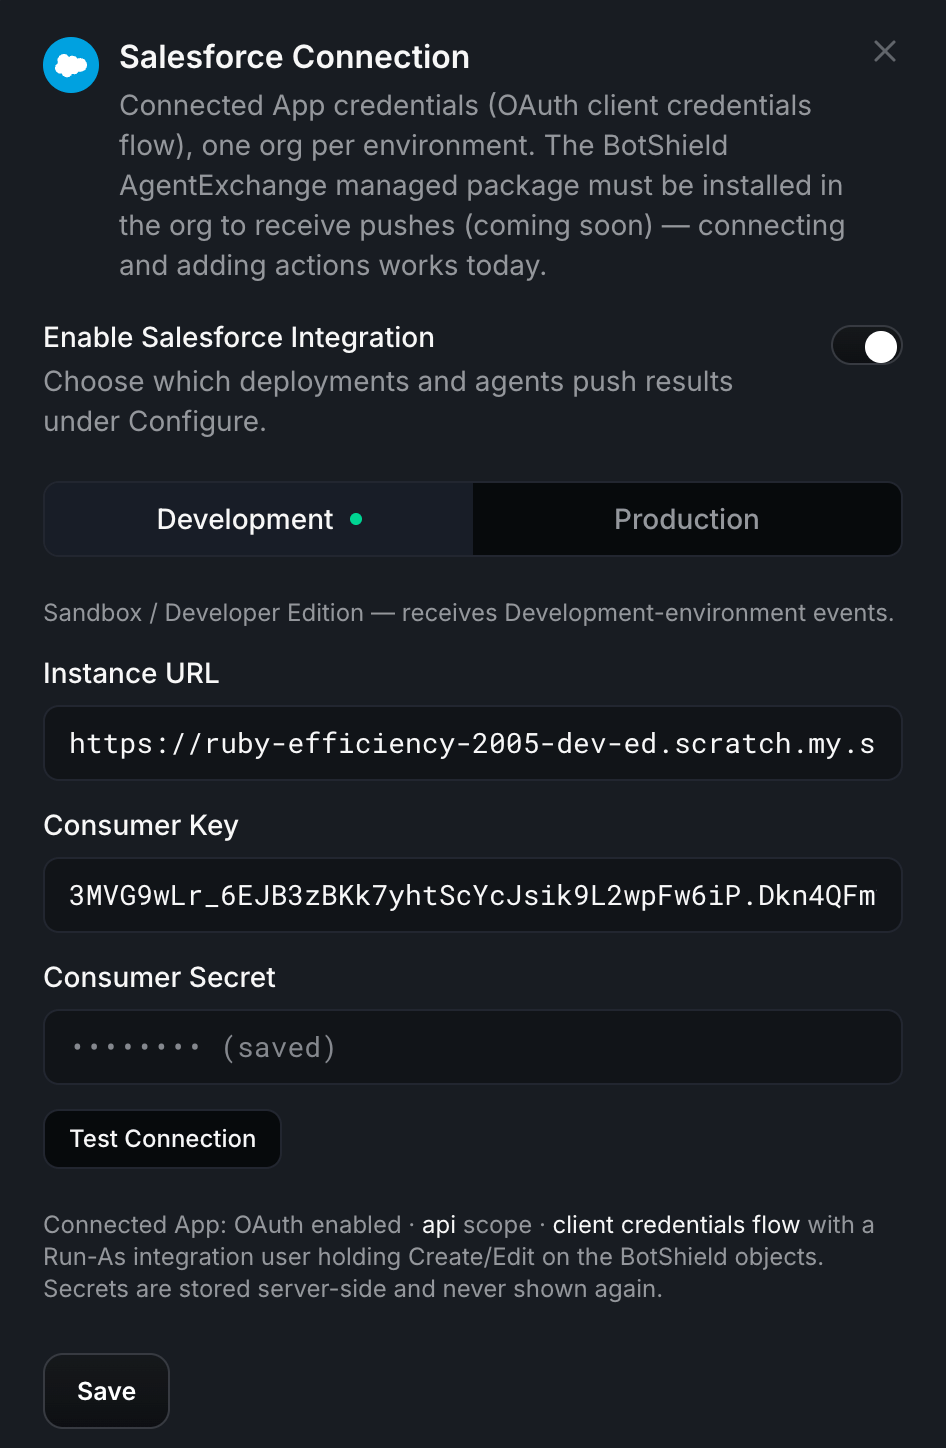
Click **Connection** on the Salesforce card. BotShield authenticates to your org with **Connected App credentials (OAuth client-credentials flow)** — one org per environment.
Choose the **Development** or **Production** tab. Development receives your sandbox / Developer Edition events; Production, your production org.
Paste your org's **Instance URL**, **Consumer Key**, and **Consumer Secret** — from the Connected App (External Client App) in your Salesforce org. The BotShield **Setup** tab's *Data push* section walks you through creating it: OAuth enabled, `api` scope, **client-credentials flow**, Run-As an integration user holding the `BotShield_Integration` permission set. Secrets are stored server-side and never shown again.
Click **Test Connection**. A green result means the Console can reach your org through the Run-As user. **Save**, then flip **Enable Salesforce Integration** on.
### 4a. Connect your org
Click **Connection** on the Salesforce card. BotShield authenticates to your org with **Connected App credentials (OAuth client-credentials flow)** — one org per environment.
Choose the **Development** or **Production** tab. Development receives your sandbox / Developer Edition events; Production, your production org.
Paste your org's **Instance URL**, **Consumer Key**, and **Consumer Secret** — from the Connected App (External Client App) in your Salesforce org. The BotShield **Setup** tab's *Data push* section walks you through creating it: OAuth enabled, `api` scope, **client-credentials flow**, Run-As an integration user holding the `BotShield_Integration` permission set. Secrets are stored server-side and never shown again.
Click **Test Connection**. A green result means the Console can reach your org through the Run-As user. **Save**, then flip **Enable Salesforce Integration** on.
 ### 4b. Choose which Gates and Agents push
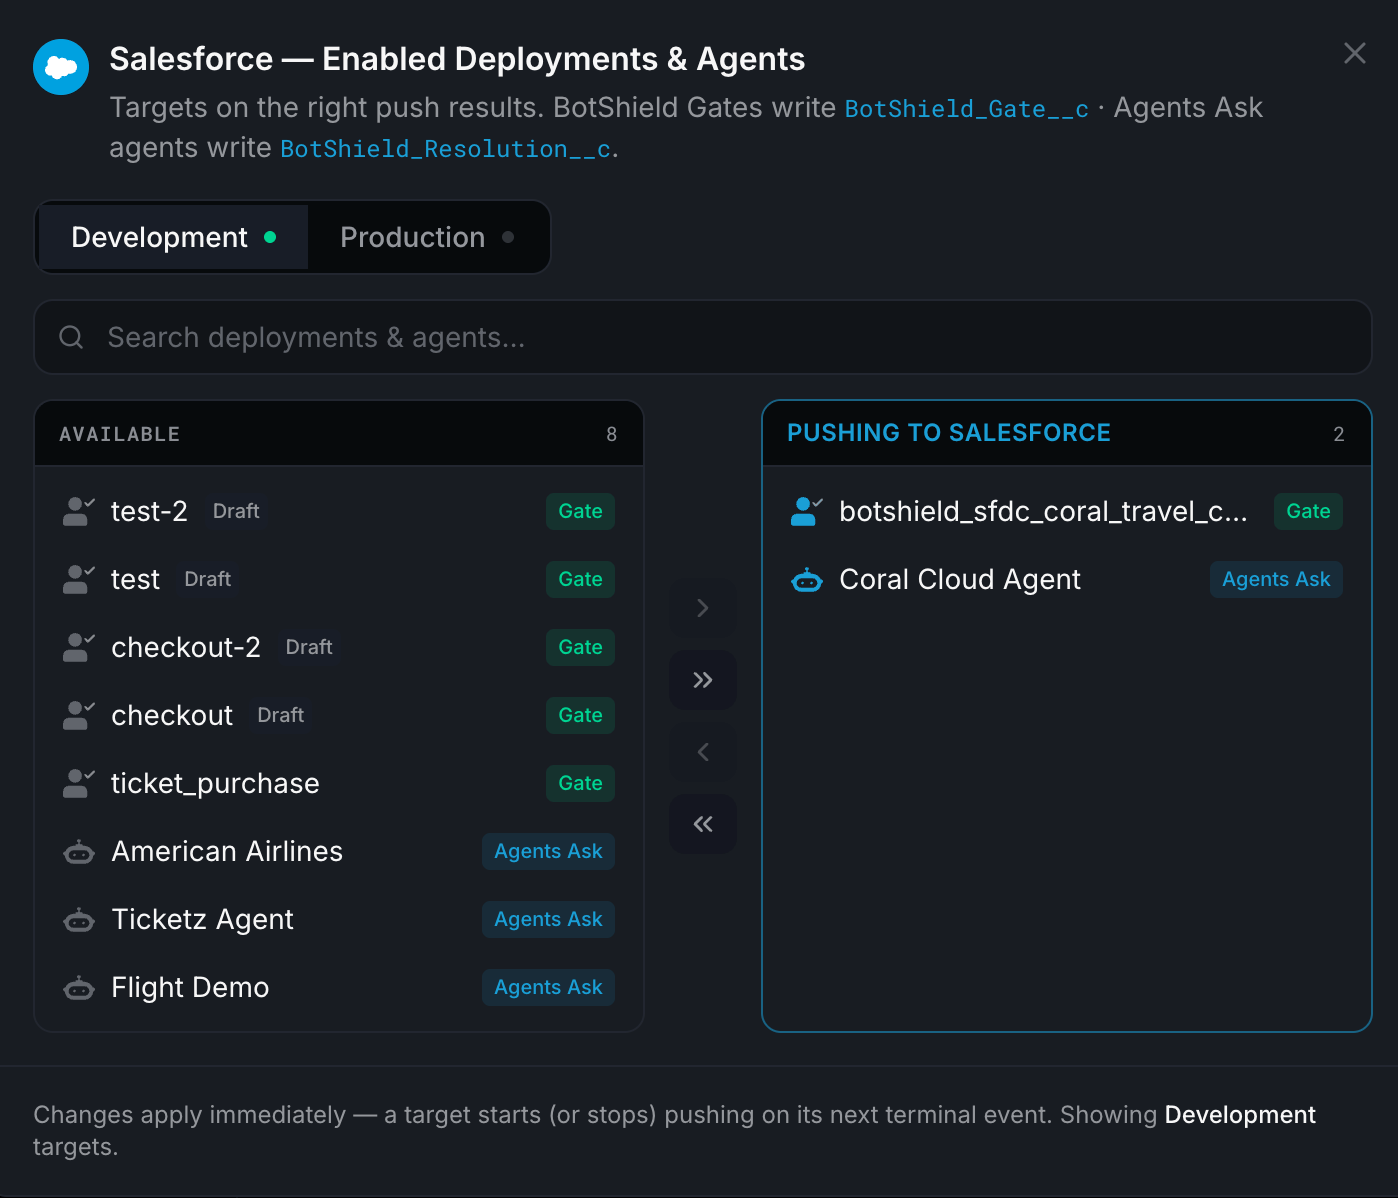
Back on the Salesforce card, click **Configure**. You'll see a two-column picker — **Available** on the left, **Pushing to Salesforce** on the right — with the same Development / Production toggle.
Move the deployments and agents you want writing into your org to the right-hand column:
* **BotShield Gates** write verification outcomes to `BotShield_Gate__c`.
* **Agents Ask agents** write approval outcomes to `BotShield_Resolution__c`.
Changes apply immediately — a target starts (or stops) pushing on its next terminal event.
### 4b. Choose which Gates and Agents push
Back on the Salesforce card, click **Configure**. You'll see a two-column picker — **Available** on the left, **Pushing to Salesforce** on the right — with the same Development / Production toggle.
Move the deployments and agents you want writing into your org to the right-hand column:
* **BotShield Gates** write verification outcomes to `BotShield_Gate__c`.
* **Agents Ask agents** write approval outcomes to `BotShield_Resolution__c`.
Changes apply immediately — a target starts (or stops) pushing on its next terminal event.
 The Salesforce integration is **one org per environment**. Point Production at your production org and Development at your sandbox — don't cross them, or pushed records land in the wrong place.
The managed-package **push** requires the BotShield AgentExchange package installed in the org. You can connect and pick targets now; pushes start once the package is installed.
## 5. Verify
Open **BotShield → Setup** and click **Re-check**. Each row turns green as its prerequisite is met — keys set, run-as user assigned, last row received. When the health pill reads all-ready, you're set.
## Next steps
Gate an Experience Cloud checkout or form.
Require human confirmation for agent actions.
Pause a Flow for a human approval.
Pair the BotShield app so people can be asked.
The Salesforce integration is **one org per environment**. Point Production at your production org and Development at your sandbox — don't cross them, or pushed records land in the wrong place.
The managed-package **push** requires the BotShield AgentExchange package installed in the org. You can connect and pick targets now; pushes start once the package is installed.
## 5. Verify
Open **BotShield → Setup** and click **Re-check**. Each row turns green as its prerequisite is met — keys set, run-as user assigned, last row received. When the health pill reads all-ready, you're set.
## Next steps
Gate an Experience Cloud checkout or form.
Require human confirmation for agent actions.
Pause a Flow for a human approval.
Pair the BotShield app so people can be asked.